This is the sixth in a series of simple exercises you can do to improve your trigger control. These exercises will help you become more aware of your trigger finger and better able to control its motions. No matter how fast you can draw or how dynamically you can move, you will not be prepared to defend yourself with a firearm until you can hit your target reliably. You cannot hit your target reliably until you develop good trigger control, and that’s what this series is about.
Trigger Awareness Exercise #6 is a live-fire drill, so get yourself to the range and load your gun. Place your target at 4 to 5 yards, close enough that you won’t waste a lot of energy thinking about the target. Today your range time is allllll about the trigger!
Step One: Feel It
Just like you did in Exercise #1: Feel the Trigger and in Exercise #2: Watch the Wobble, you must press the trigger very, very slowly while keeping your front sight as well-aligned as humanly possible. Press that trigger SLOWLY. Do not speed up just because you’re going live. Keep it agonizingly slow so you can feel the trigger as you work.
Line up your sights just as you did in Exercise #2. Keep your eye on your front sight, but don’t worry about the sights right now. Instead, think only about what’s happening underneath your trigger finger.
Press the trigger very slowly and very smoothly. Make it move at exactly the same speed from the beginning of your trigger press all the way back until the shot fires. Don’t speed up toward the end (“the shot should fire … NOW!!”). Just steadily increase your pressure on the trigger while you concentrate on what you feel with your finger.
As you press the trigger, concentrate on what you feel with your trigger finger. What stays the same as when you dry fired? What feels different? As the trigger moves, can your finger feel any mechanical changes going on inside the gun? Any little crunches or bits of grit? Does the trigger get heavier as you bring it to the rear? Does it feel the same all the way back?
When you were thinking about how the trigger felt under your finger, did the shot going off surprise you? If so, that’s a good sign – and your target probably looked pretty good, too. As long as you concentrate on pressing the trigger smoothly, and on what your finger feels while you’re doing that, you will be far more likely to hit where you intend to hit.
Feel every slight little motion inside the trigger, slowly, at least five more times before moving on to the next step.
Step 2: Slacker
Since you have practiced feeling your trigger so much during these exercises, you may have noticed something we call “trigger slack.” On some guns (not all), the trigger will travel freely and without resistance for a little ways before you can feel the mechanisms inside the gun start doing their work. That extremely light movement, before you can feel any resistance from the trigger, isn’t doing any work inside the gun. It’s just slack.
If your gun has some trigger slack – remember, not every gun does – line your sights up on target and press the trigger just to the point where you begin to feel resistance. Can you feel that point? How far back is it?
Different trainers recommend different ways to deal with slack. At Cornered Cat, I like to see my beginning shooters simply pressing the trigger at the same speed all the way back, regardless of the change in trigger weight as the trigger moves. For more advanced shooters, it can be helpful to remove the slack quickly before you begin your real trigger press. However, removing the slack at a different speed than you perform the rest of the trigger press is an advanced skill that can get in the new shooter’s way. Since I can’t see you shooting right now, I can’t make a personalized recommendation for you.
For now, here’s what I want you to do: If your trigger has slack at the beginning of the press, play around with it a little. Find the spot where the slack stops and the real trigger press begins. Be aware of that point and learn where it is so well that you can’t bring yourself to crash through it without noticing.
Practice finding the slack point enough times that you can do it without thinking about it. You don’t want to be in the habit of ‘crashing through’ the slack into the heavier, real trigger press, and you do want to be able to remove the slack as efficiently as possible when you start shooting. So pay close attention to where the slack ends and teach your finger how to find that point easily, without having to think about it.
Again: not every trigger will have slack. The above section was only for those who have triggers with slack in them. If you can’t tell whether it applies to you and your gun, it didn’t. Just press your trigger smoothly and don’t worry about it.
Part C: Wobble Reprise
Now that we’re on the range, you’re probably noticing more wobble in your sights than you did at home in dry fire. That’s okay. Everyone wobbles, especially when adrenalin gets involved. Guess what, friends? Shooting a live firearm usually gives us a nice solid dose of adrenalin! So it’s not surprising if you find your hands trembling or shaking, or see your sights wobbling. That’s all normal and perfectly acceptable. Just be sure to stay in control of your own trigger press, and you’ll be fine.
Some people will have a hard time accepting the wobble. If you’re one of them, I want you to do trigger press WRONG for this next step. Yes, really. (What kind of a trainer tells students how to do things wrong? Um, me apparently! Just so you know, I’m telling you how to do it wrong so that you can more easily understand why the other way is better.)
WRONG: (But do it anyway so you can see it happening.) Line up your sights. Watch the wobble. When the front sight wobbles across the exact center of your target, yank the trigger back just as fast as you can! Do this at least five times and then mark your target so you know where the shots went.
RIGHT: Line up your sights. Watch the wobble, but don’t worry about it. As your sights wobble a little bit, keep lining them back up with the center of your target while you press the trigger slowly and smoothly. Don’t make the gun fire at any particular time; just press the trigger until it does fire. Do this at least five times and then compare your hits to the others.
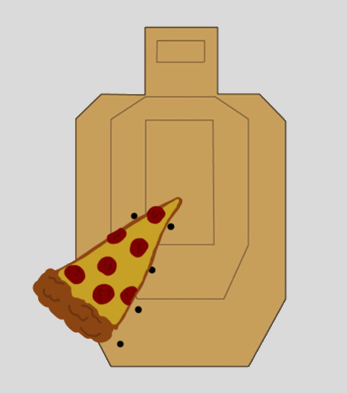
Pizza-slice patterns are caused by sudden trigger yanks and by flinch. These are two separate problems with different solutions.
When you suddenly yank the trigger back, your shots will often go low. For a right handed shooter, the shots will usually hit low left, while for a left handed shooter they will usually hit low right. On the other hand, when you accept the wobble and simply press the trigger at the same speed from start to finish, your shots will usually go exactly where you intended them to go.
Incidentally, this sudden yank isn’t the same thing as a flinch, even though the target will look about the same. (That pizza slice, remember?) A flinch tends to happen when your body reacts ahead of time to the expected recoil. From the inside, a true flinch feels a little bit like when your knee jerks when the doctor checks your reflexes. It’s not a reflex (it’s within your control), but it feels kind of like that. That’s not what we’re talking about here. What we’re talking about here is simply when you choose to suddenly do an uncontrolled yank on the trigger to get ahead of your own wobbly sights.
As you’ve probably surmised, you can have both a trigger-yank problem and a flinch problem. Your work in dry fire will definitely remove the flinch, but the only way to fix the yank is by making a mental shift to accept the wobble while realigning the sights throughout your trigger press.
To finish up your range time, press the trigger the right way, with full concentration on your front sight and a steady trigger press, at least 20 more times.


Pingback:TAE #7: Follow Through | Cornered Cat