Gun cleaning is one of the subjects I have hesitated to address. It’s not that I don’t know how to clean a gun (I do), it is that there are a lot of very vehement opinions about gun cleaning among gun owners out there. I’m not really eager to gore anyone’s sacred cows, so let me just say this: what is shown below is a way to clean handguns, not necessarily the way to do it. If you or someone you know and love has a different way of doing things, that’s really okay. Just so long as the gun does get cleaned often enough that its function remains absolutely reliable, it’s all good.
Oh, yes: I would simply hate it if someone read this page and died of a misprint, but please do note the disclaimer at the bottom of the page. This tutorial assumes that you are an adult and that you are going to read and carefully follow the directions on each and every bottle of gun-scrubbing goop you pick up. If you don’t, and come down with a nasty case of the creepy crud, please don’t blame it on me. Follow the instructions on the bottle, wear the safety gear even though it feels silly, and if you have any doubts about your ability to do this safely, find a knowledgeable person to walk you through the process personally.

When to Clean
One of the first questions beginners usually ask is, “How often should I clean my gun? Do I need to clean it after every time I shoot it?” The answer to that question is, “It depends.”
If you are cleaning a range toy rather than a defensive gun, you can probably allow the crud to build up a little bit before cleaning it, even though it is usually somewhat easier to remove the crud when the cleaning is done immediately. Years ago, back when buffalo roamed the plains, everyone shot black-powder rifles which absolutely positively had to be cleaned immediately after shooting, because black powder was (and is) such a corrosive substance that it would ruin the gun if the fouling were left in the barrel. Modern powder is not corrosive, and so it won’t eat its way through the metal of your barrel if it gets left in there for awhile.
The fouling can and often does affect reliability, however. Uncleaned guns are more apt to jam when you most need them. Because the crud can slow down the slide, dirty semi-automatic firearms are prone to failures to feed or failures to completely eject the spent cases. Uncleaned revolvers are prone to binding up, and the double-action trigger can become difficult or impossible to pull if the cylinder isn’t turning easily. Poorly-cleaned or uncleaned firearms are thus far less reliable than their well-cleaned and properly lubricated counterparts.
For this reason, I highly recommend that you clean your defensive handgun immediately after every trip to the range, no matter how many or how few shots you fire. Since you will be betting your life on the function of your gun, it’s a good idea to keep it as clean as you can, in order to avoid fouling-related problems.
Why Clean Your Own Gun?
Many of us women live with men who are perfectly willing to clean our firearms for us. If that’s the case, why should you do it yourself?
Cleaning your own gun helps you become familiar with how your gun works. Although the mechanical function of the gun may not be fascinating to you, it’s still a good idea to know how it works. That way, if it ever stops working when you need it most, you will have a solid idea of what went wrong and whether you will need a professional to fix it.
Taking the gun down and putting it back together again on a regular basis helps you develop confidence in your gun-handling skills. This confidence carries over to how you handle the firearm on the range and in real life.
Cleaning your own gun allows you to visually inspect all the inner pieces of your gun, so that you spot the signs of wear and tear and are able to replace worn pieces before they break on you.
And let’s be honest: men aren’t always a permanent fixture in women’s lives. If he runs off to Tahiti with that bimbo from his office tomorrow, it’s one less thing for you to learn once he’s gone.
The Basic Cleaning Kit
With a few exceptions, the cleaning products shown in the pictures on this page and the pages that follow are nearly all Hoppes brand. That is because, for the purpose of this tutorial, I went out and purchased the most basic ten-dollar cleaning kit I could find, and the kit was Hoppes brand. My thinking was that these kits are available ‘most everywhere in America, and this was how a beginner would probably start. As time goes on, you will probably find your own preferred products, and fill in your kit with other tools and supplies. Until you get to that point, these basic kits are a perfectly acceptable way to clean guns and a good place to start.
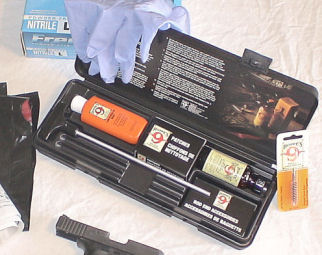 |
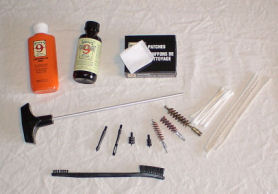
Inside the basic cleaning kit, you will usually find:
- A bottle of solvent [Image]
- A bottle of lubricating oil [Image]
- A rod [Image]
- A jag (attaches to the end of the rod)
- A patch holder (attaches to the end of the rod) [Image]
- Patches [Image]
In order to complete your cleaning kit, you must purchase a bore-cleaning brush which attaches to the rod in your cleaning kit. The brush has to be purchased separately because they come in different sizes for different calibers of guns. A 9mm bore brush is too small to effectively clean the bore of a .45 ACP firearm, for example, while the .45 ACP bore brush will not even fit within the barrel of the 9mm gun. So make sure you get the correct size of brush for your gun.
Plastic, stainless steel, and bronze brushes are available. For basic cleaning, the brush should be made of bronze rather than of plastic or stainless steel. The only reason to switch to a plastic bore brush is if you are going to be using a separately purchased, super-powerful solvent designed to dissolve copper fouling, because bronze brushes will also be dissolved by such solvents. In all other cases, the bronze brushes are far easier to use and will get the gun cleaner with less hard work on your part than the plastic brushes will.
Stainless steel bore brushes have the opposite problem. Unlike plastic, which is generally too soft to do a good job, the metal in a stainless steel brush is as hard as the metal in the bore of a firearm. This means that a stainless steel brush would damage the barrel if the brush ends were bristly. In order to avoid this problem, manufacturers of stainless steel brushes use a slightly different design from the plastic or bronze brushes, so stainless steel brushes are looped rather than bristly. Unfortunately, this design just doesn’t clean as well as good old fashioned bristles do, so you get a double whammy with these — the stainless steel brush is so hard that it might damage your barrel, but it still doesn’t clean as well as a bristly brush made of the softer bronze.
After a few uses, you will run out of the kit-supplied cleaning patches. When that happens, you can go out and buy more store-bought patches. Or you can simply make your own by cutting similar-sized squares out of old cotton tee shirt material. If my kids haven’t outgrown or otherwise destroyed enough old tee shirts when I need new patches, I usually just purchase “new” old tee shirts from the local garage sales for a quarter apiece. Yes, I am a cheapskate.
Other Cleaning Supplies
There are other supplies you may want to have on hand. Some of these are simply nice to have, while others come close to being essential. Most of them can be found lying around your house.
 |
- An old toothbrush. You can purchase a specially-designed scrub brush in the same basic shape [Image]. A plain old toothbrush will do just as well. Do make sure it’s been very thoroughly rinsed to remove old toothpaste grit.
- Q-Tips. I mean cotton swabs. Q-Tips is a brand name, and the brand isn’t important. Some people hate them for cleaning because they can leave lint behind if you’re not careful. I love them, and I avoid leaving lint behind by being careful.
- Pipe cleaners. [Image] Don’t get craft-store pipe cleaners, which are usually made of nylon or some other non-absorbent and not so useful material. Genuine pipe cleaners are made of cotton and are designed to clean awkward small spaces; you can usually find them in the big-box stores in the same checkout stand where cigarettes are sold. Some pipe cleaners have flecks of bristly-brush nylon interspersed between absorbent cotton fluff, and these are very cool if you can find them.
- Cleaning rags. You can get by with only one rag, but will probably want a handful. You can specially purchase shop rags made for the purpose, or just use hand-sized squares of old cotton tee shirt material or an old dish towel you aren’t going to use in the kitchen anymore. Try to avoid using anything too lint-y. Expect to stain these rags; they can be washed 1 and re-used, but the stains will probably be permanent.
Safety Gear and Other Protective Stuff
 |
In addition to your basic cleaning kit and cleaning supplies, you will need a way to keep any spilled or dripped solvents from destroying the finish on your furniture. I use several layers of newspaper, laid out on top of a large plastic garbage sack. When my gun cleaning chores are done, I crumple up the newspaper and the icked-up disposable patches, then flip the plastic bag inside-out to catch the whole mess. Turning the bag inside-out neatly places the smelly solvents on the inside of the bag, thus trapping the smells a bit better. (To avoid wasting trash-sack space, I then empty the rest of the trash in my home before carrying the bag out. Waste not, want not.)
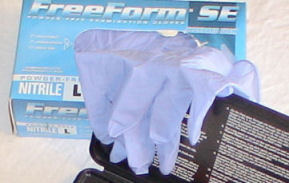
You will also need a way to keep the solvents off your hands. To some extent, this problem could be solved by purchasing some of the newer, high-tech solvents which tend to be a bit more hand-friendly. However, no matter how “non-toxic” the solvents themselves might be, they are still disolving some pretty nasty stuff that is better to avoid getting on your hands. Oh, plus they are going to destroy your manicure if they get anywhere near your fingernail polish; that’s what solvents do for a living, after all. So get yourself some gloves. I use gloves made of nitrile, not latex. Latex gloves are cheaper, but they tend to fall apart before the cleaning is done, which really defeats the purpose. Nitrile gloves hold up to the solvents and since I began using them, I’ve never again ruined one fingernail of a fresh manicure while gun cleaning. (Stuff the guys just won’t bother telling you!)
 |
Finally, you really should wear safety goggles whenever you are working with gun-cleaning solvents. Even the not-so-toxic types are dissolving some very nasty stuff which can do some significant and permanent damage to your irreplaceable eyeballs if it lands in your eyes. As you run the bore brush in and out of the bore, the stuff is going to spray around a bit no matter how careful you are, so you do need full eye protection.
I probably sound a bit cranky about eye protection. There’s a reason for that. A few years ago, when I first got into firearms, I accidentally splashed a bit of solvent onto my prescription glasses. The plastic lens was immediately etched deeply by the cleaning stuff. I was so thankful that it wasn’t my eye, but quite irritated that it destroyed my new pair of glasses. Don’t take the chance of it being your eyeball that gets etched like that, okay?
Notes:
- Please read my disclaimer again, and please don’t ick up your washing machine or set your dryer on fire by doing something foolish when you clean your solvent rags. You can wash them entirely by hand. Or you can rinse them first, wash them separately, and air-dry rather than tossing them into the dryer. ↩